How to Sync Your Google Calendar to Outlook (2026 Guide)
·
If you live in Google Calendar but your team works in Outlook (or vice versa), getting your events into both is the difference between confidently accepting a meeting and triple-booking yourself. Below are the three working methods in 2026, when each one fits, and the quirks that catch people out — Workspace policies, recurring events, refresh delays, and reminder loss.
Quick answer
- One-time import: download your Google Calendar as an
.icsfile and import it into Outlook. About 10 minutes. No ongoing sync. - Outlook subscribe to a Google URL: read-only, refreshes every few hours, can’t edit Google events from Outlook.
- Automatic two-way sync: a tool like XCalSync keeps both calendars in step every few minutes, with controls over which events copy and how their details show.
For a one-shot migration, Method 1 is fine. For ongoing visibility, jump to Method 2 or Method 3.
Going the other direction (Outlook → Google)? See How to sync your Outlook Calendar with Google.
Trying to merge two Google calendars instead? See How to sync and merge multiple Google calendars.
Method 1: Export from Google and import into Outlook
This is the only built-in way to copy your full Google Calendar history into Outlook. It’s a snapshot — events created or edited in Google after the export won’t sync to Outlook automatically.
Step 1: Export your Google Calendar
-
Sign in at Google Calendar.
-
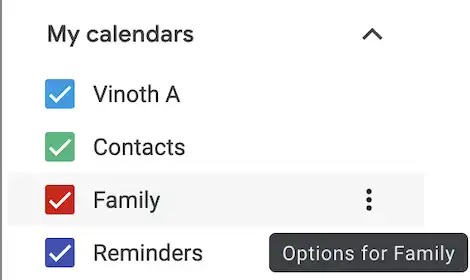
In the left sidebar, hover over the calendar you want to export and click the three-dot menu. Pick Settings and sharing.
-
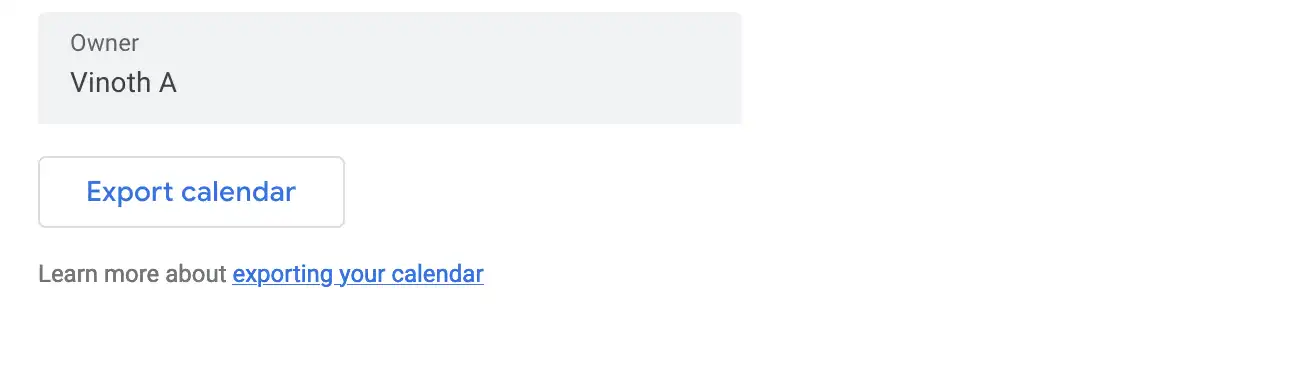
Scroll down to Export calendar and click Export.
If you don’t see Export, your account doesn’t have permission to export this calendar — usually because it’s a Google Workspace calendar with admin restrictions or a calendar shared to you read-only. Ask the owner or your Workspace admin.
-
Google downloads a
.zipfile containing one.icsfor each calendar your account owns. Unzip it and grab the.icsmatching the calendar you want.
By default, Google exports events from the past year only. To capture older events, you’ll need to scroll back in Google Calendar and confirm the date range — or better, use a sync tool that handles the full history.
Step 2: Import the ICS file into Outlook
The cleanest path is Outlook on the web, but the desktop and Mac clients work too with slight differences.
Outlook on the web
-
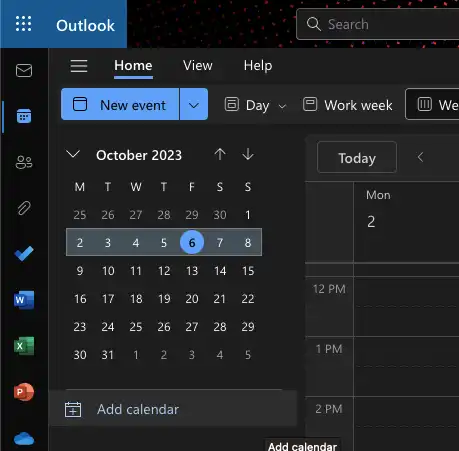
Sign in at outlook.com and open Calendar.
-
In the sidebar, click Add calendar above My calendars.
-
In the dialog, choose Upload from file.
-
Click Browse, pick the
.icsyou extracted from Google, and choose the destination calendar from the dropdown — pick a dedicated calendar like “Google import”, not your primary, so you can hide or delete it without affecting native Outlook events.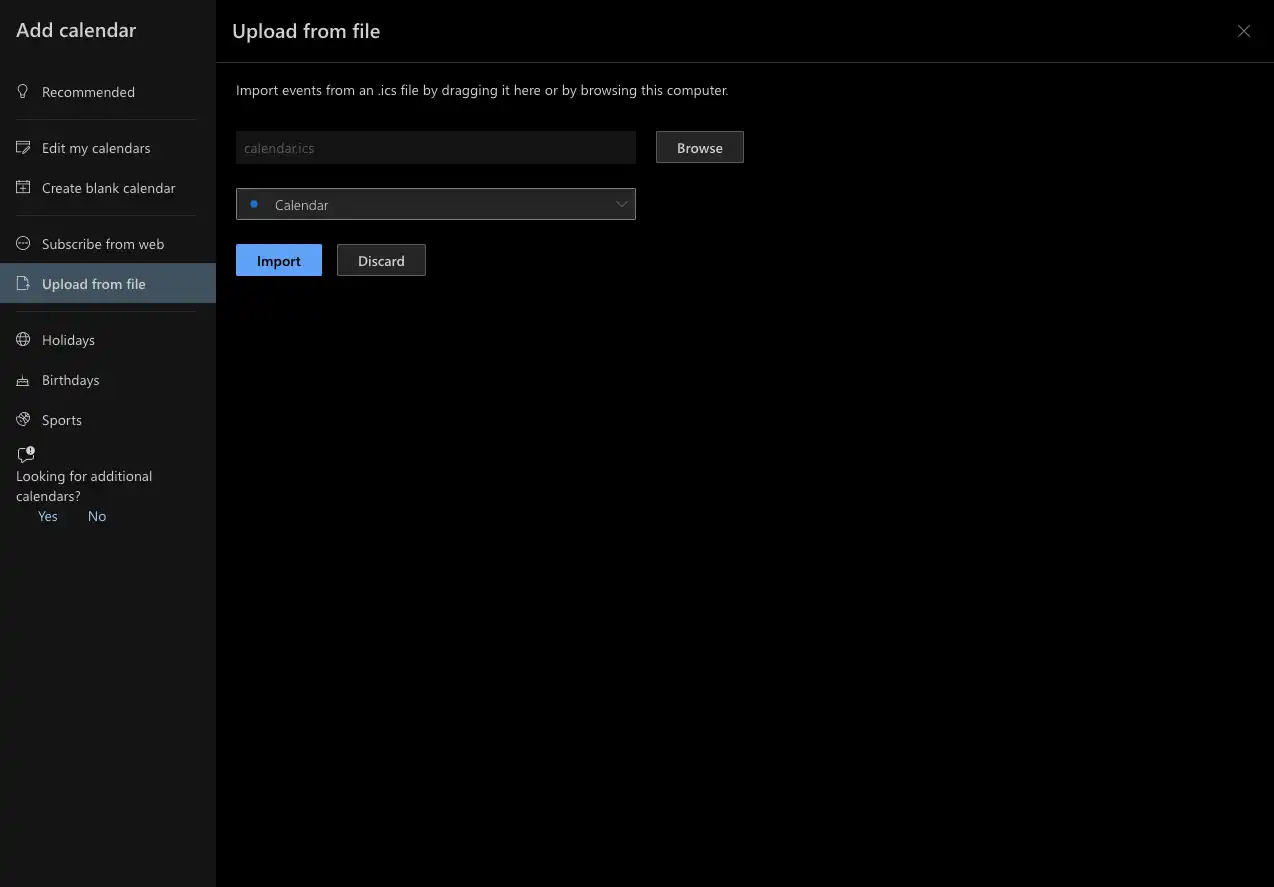
-
Click Import.

Outlook desktop (Windows)
- Open Outlook desktop and switch to Calendar.
- File → Open & Export → Import/Export.
- Pick Import an iCalendar (.ics) or vCalendar file (.vcs), click Next, browse to the file.
- Choose Import (merges into the selected calendar) or Open as New (creates a separate calendar — usually what you want for a Google import).
Outlook for Mac
The Mac client doesn’t have a direct import dialog. Drag the .ics file from Finder onto the Outlook icon in the dock — Outlook opens an import dialog. Alternatively, double-click the .ics; Outlook should claim the file and prompt you to import.
That’s the snapshot. The events are now in Outlook but no longer linked to your Google account — future Google changes won’t appear here.
Method 2: Subscribe Outlook to your Google Calendar URL
If you want Outlook to track changes in Google instead of taking a one-time snapshot, you can subscribe Outlook to Google’s secret iCal URL.
-
In Google Calendar, hover over the calendar → three-dot menu → Settings and sharing.
-
Scroll to Integrate calendar and copy the Secret address in iCal format (the public URL is OK if the calendar is public; otherwise use the secret one).
Treat this URL as a password. Anyone with the secret URL can read every event in the calendar. Don’t paste it into a public Slack channel or commit it to a git repo.
-
In Outlook on the web, open Calendar, click Add calendar → Subscribe from web.
-
Paste the Google iCal URL, give the calendar a name, pick a color and parent calendar, then Import.
A new entry appears under Other calendars. Outlook refreshes the subscribed calendar roughly every 3 hours — there’s no manual refresh button. Events show in Outlook but are read-only: you can’t edit, accept, or move them from Outlook.
For most knowledge-worker use cases (you check Outlook for “what’s blocking the next hour”), the 3-hour refresh is acceptable. For real-time scheduling, it isn’t.
Method 3: Automatic two-way sync with XCalSync
The two manual methods cover one-time copy and read-only subscribe. Neither lets you edit an event from either calendar and have the change propagate. That’s where XCalSync fits.
What XCalSync does that the manual methods don’t:
- Two-way sync: create a meeting in Google or Outlook and it shows up in the other within minutes, editable from both sides.
- Authenticated, not URL-based: connects via OAuth to Google and Microsoft. No public ICS URL to leak or rotate.
- Selective filters: only sync events on specific days, only events matching a name, skip “tentative” RSVPs, exclude all-day events. Manual import is all-or-nothing.
- Title rewriting: replace “Lunch with Sara at Maru” with “Busy” in the destination so colleagues see availability without reading details.
- Buffer time: add a 15-minute pre-event or post-event buffer to copied events so back-to-backs don’t sneak in.
- History preservation: edits, deletions, and moves replicate; the original event reference is kept so duplicates don’t accumulate.
Setup:
- Sign up at app.xcalsync.com.
- Click Add account → Google, grant calendar access via OAuth.
- Click Add account → Outlook, authorize the Microsoft sign-in.
- Create a SyncPair. Pick the source calendar (Google), destination (Outlook), direction (one-way or two-way), and any filters.
- Save. XCalSync runs the first sync immediately and continues on a regular schedule.
The free tier covers a single SyncPair. Paid plans start at $4/month for two calendars or $8/month for up to ten.
Troubleshooting
”Failed to import” or “File could not be read”
Google’s export wraps each calendar’s .ics in a zip. Some import dialogs (notably older Outlook desktop) won’t read directly from inside a zip — extract the .ics to disk first.
Events appear at the wrong time
The exported .ics includes time-zone information from Google’s account settings. If Outlook is set to a different time zone, events shift. Either align both calendars to the same time zone before exporting, or accept the offset and adjust mentally.
Some events are missing
Google’s export defaults to events from the past year. Older events are dropped without warning. To pull a longer history, you’ll either need to manually scroll back to ensure events are populated, or sync via XCalSync, which doesn’t have a default window.
Recurring events broken after import
The most common offender is a recurrence pattern with custom exceptions (“every Monday except the second one in November”). Outlook handles a subset of iCalendar’s recurrence rules — patterns Google supports natively don’t always survive the round trip. Edit the original to a simpler recurrence, re-export, re-import.
”Subscribe from web” fails with the iCal URL
If Outlook rejects the URL, it’s almost always because the calendar isn’t accessible without authentication and you’re using the public URL instead of the secret URL. Use the Secret address in iCal format from Google’s Integrate calendar section, not the Public address.
Workspace admin blocks the import
Google Workspace admins can disable external calendar sharing globally. If the Export option is missing in Google Calendar’s settings, that’s the cause. The admin needs to enable Allow users to download events to non-Google calendars in the Workspace admin console. There’s no client-side workaround.
What manual methods don’t give you
- Two-way edits. Both manual methods are one-way. Editing the destination doesn’t update the source.
- Selective sync. You can’t filter out personal events from the import.
- Title control. Confidential meeting titles end up in the destination calendar exactly as written in the source.
- Conflict handling. If the same event ends up imported twice, you delete duplicates by hand.
For a single migration to the new platform, manual is fine. For ongoing dual-platform work — which is most people who search for this — XCalSync saves the recurring pain. Free to try, no credit card required.
Frequently asked questions
- Outlook can subscribe to a Google Calendar URL for read-only updates, but the refresh is delayed (often several hours) and you can't edit the events from Outlook. For two-way sync where edits in either calendar propagate, you need a third-party tool like XCalSync.
- The export/import flow in this guide works for both personal Outlook and Outlook 365 (work and school) accounts. If your IT team has restricted external calendar sharing, the Add calendar from URL option may be disabled — check with your admin or use an authenticated sync tool that goes through OAuth instead.
- Google's export caps each .ics file at events from the past year by default, so older events are dropped silently. To capture everything, change the date range in Google Calendar settings before exporting, or sync via XCalSync which doesn't have a window limit.
- Notification settings don't transfer. Google's reminders ('15 minutes before by email and pop-up') aren't part of the iCalendar standard's event-level data in a way Outlook reliably honors. Default reminders applied at the calendar level need to be reconfigured on the Outlook side.
- Yes. Google's Export downloads one .ics per calendar inside a zip — pick only the calendar you want and ignore the rest. If you need ongoing one-calendar-only sync, the subscription URL method or XCalSync (with calendar selection) are better than repeating the export.
- Yes for export and import. The catch is admin policy — some Google Workspace tenants block external sharing or restrict who can subscribe to internal calendars from outside the organization. If the export option is missing, your admin has disabled it.
- Most do. Failure modes are usually around exceptions (an event series with one cancelled or moved instance), all-day events near time-zone boundaries, and Google-only features like 'event color'. Spot-check a recurring meeting after import.
- Outlook fetches subscribed calendars roughly every 3 hours, though Microsoft doesn't publish a guaranteed interval. There is no manual refresh button. If you need near-real-time visibility, use a sync tool instead of subscription.