How to Merge Calendars in Outlook (2026 Guide)
If you’re juggling multiple Outlook calendars — a personal @outlook.com, a work Microsoft 365 account, and maybe a contractor inbox — the people scheduling meetings against any one of them only see that single calendar’s busy times. The result: easy double-bookings.
This guide covers the three working ways to merge calendars in Outlook in 2026, when each fits, and the gotchas: Microsoft 365 sharing policies, recurring events, and what overlay does that merging doesn’t.
Quick answer
- Overlay (Add from directory or Subscribe from web): see another Outlook calendar in your primary view. Read-only. Best when you only need visual overlap.
- Publish and import: copy events from one Outlook calendar into another. Editable in both, but no ongoing sync.
- Automatic two-way sync: a tool like XCalSync keeps two Outlook calendars (or Outlook ↔ Google) updated continuously, with filters and field controls.
If you only need yourself to see all calendars at once, Method 1 is the fastest. To have attendees see availability across both, jump to Method 2 or Method 3.
Need to sync between Outlook and Google? See How to sync your Outlook Calendar with Google.
Doing this with Google calendars instead? See How to merge two Google calendars.
Method 1: Overlay view
The fastest option when you only need to see all calendars in one place.
Add from directory (same Microsoft 365 tenant)
If both calendars live in the same Microsoft 365 organization (e.g., two work accounts at the same company):
- In Outlook on the web, open Calendar.
- In the sidebar, click Add calendar → Add from directory.
- Search for the second user, pick them, click Add.
The second calendar appears under People’s calendars. Visibility into details depends on the second account’s sharing settings — by default, work accounts share free/busy only.
Subscribe from web (across tenants or personal accounts)
For calendars in different tenants or a personal + work split:
- On the source Outlook account, open Calendar settings → Shared calendars → Publish a calendar.
- Pick the source calendar, set permissions to Can view all details, click Publish, and copy the ICS URL (don’t download — copy the link).
- On the destination Outlook account, click Add calendar → Subscribe from web.
- Paste the ICS URL, name it, click Import.
The destination shows the source events as a read-only overlay. Refresh interval is roughly 3 hours and there’s no manual refresh button.
Outlook desktop overlay mode
Outlook desktop can also show multiple calendars in overlay or side-by-side view:
- Right-click any calendar in the navigation pane.
- Pick Overlay to combine multiple calendars in a single grid.
This is a viewing mode — events stay on their source calendars and aren’t copied or merged.
Method 2: Publish and import
This copies events from one Outlook calendar into another so they become native, editable events on the destination. One-time copy, no ongoing sync.
Step 1: Publish the source calendar
The publish flow lives in Outlook on the web. The desktop client has a separate Save Calendar export that’s useful for date-range exports — covered below.
-
Sign in to the source Outlook account at outlook.com.
-
Open Calendar, click the gear icon, pick Calendar settings.
-
From the left menu, choose Shared calendars.
-
Under Publish a calendar, pick the source calendar, set permissions to Can view all details, click Publish.
-
Outlook generates two URLs. Click the ICS link → Download.
-
A
.icsfile downloads. Rename it to something memorable.
Privacy note: the published ICS URL is unauthenticated — anyone with it can read every event. Once the import is done, return to Shared calendars and click Unpublish to invalidate the URL.
If “Publish a calendar” is greyed out, your Microsoft 365 tenant has disabled external publishing. Use the desktop alternative:
Outlook desktop alternative
- Open Outlook desktop, switch to Calendar.
- File → Save Calendar.
- Choose iCalendar Format (*.ics) → More Options.
- Set the date range and detail level (Full details preserves attendees and bodies).
- Save the file.
This bypasses tenant web publishing rules.
Step 2: Import into the destination Outlook
-
Sign out of the source account and sign in to the destination at outlook.com, or use a private browser window.
-
Open Calendar.
-
In the sidebar, click Add calendar.
-
Choose Upload from file.
-
Click Browse, pick the
.ics, choose a dedicated destination calendar from the dropdown (e.g., “Imported from old account”) rather than your primary.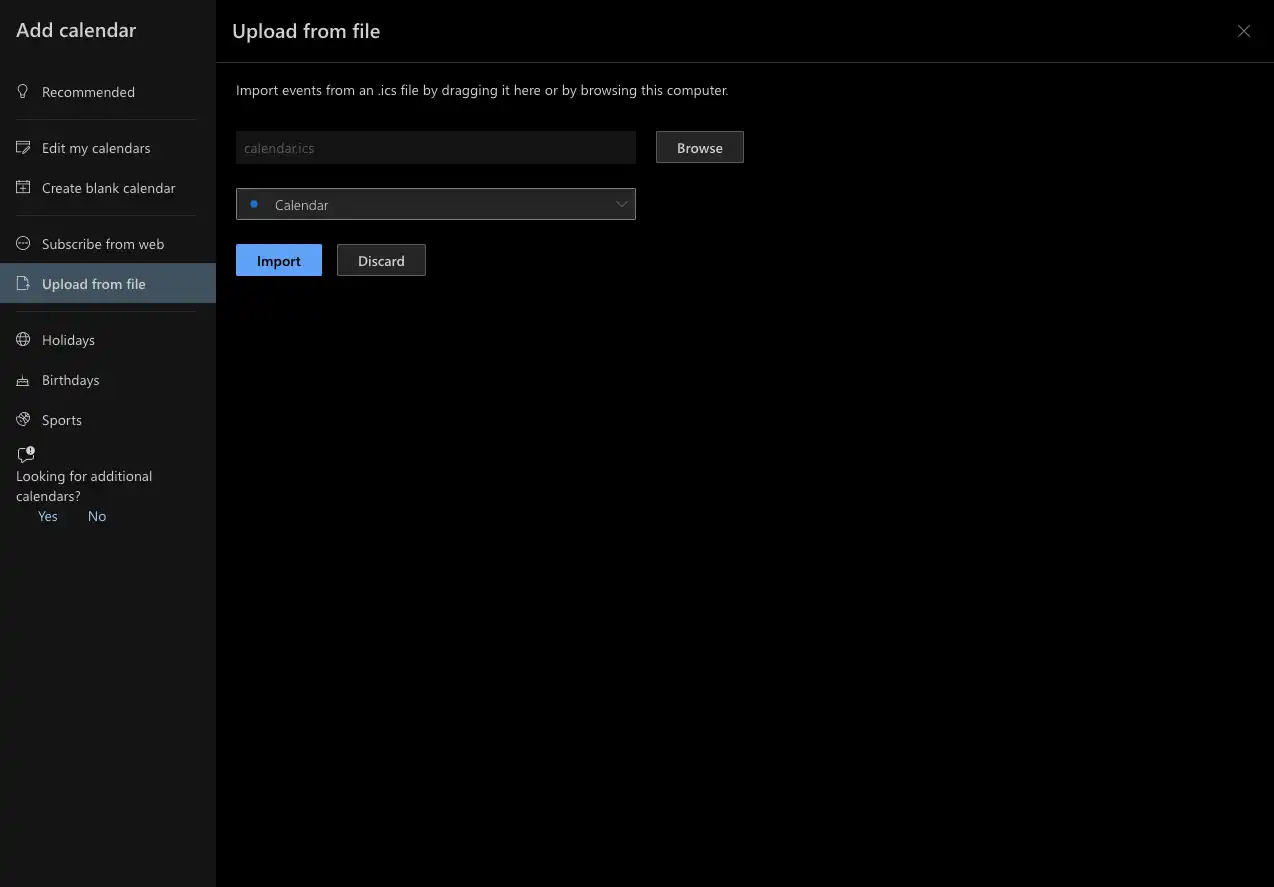
-
Click Import.

Outlook reports the number of events imported.
Make it bidirectional
Repeat the entire flow with the accounts swapped: publish from the destination, sign in to the source, import. Both calendars now contain a snapshot union of events. Note this is still a one-time copy — future changes don’t propagate.
Method 3: Automatic two-way sync
For ongoing real-time sync, XCalSync connects both Outlook accounts via OAuth (Microsoft Graph) and keeps them updated.
What it gives you that the manual methods don’t:
- Two-way sync. Edit a meeting in either Outlook account, the change replicates in minutes.
- Cross-tenant. Works across personal
outlook.comand Microsoft 365 work/school, plus Outlook ↔ Google. - Selective filters. Only sync weekdays, only events with certain attendees, skip “tentative” or “free” events.
- Title rewriting. Replace personal event titles with “Busy” in the work calendar.
- No URL exposure. OAuth-based, no public ICS URLs to leak or rotate.
- Bypasses publishing restrictions. Most tenants allow third-party calendar apps via OAuth even when they restrict ICS sharing.
Setup:
- Sign up at app.xcalsync.com.
- Click Add account → Outlook, sign in to the first account.
- Click Add account → Outlook again for the second account.
- Create a SyncPair: source → destination, direction (one-way or two-way), filters.
- Save. The first sync runs immediately; ongoing syncs run on a schedule of minutes.
The free tier covers a single SyncPair. Paid plans start at $4/month for two calendars.
Common questions and gotchas
Imported events appear at the wrong time
Time-zone mismatch between source and destination accounts. The .ics carries the source’s time-zone interpretation. Set both accounts to the same time zone before importing.
Recurring events show only one occurrence
A recurrence rule didn’t survive the export. Most often this is a custom recurrence with exceptions (“every Monday except the second one”). Edit the source to a simpler pattern, re-publish, re-import.
”Publish a calendar” is missing entirely
Your Microsoft 365 tenant has disabled external publishing. Use the desktop Save Calendar export, or switch to a sync tool that authenticates via Microsoft Graph (XCalSync) — most tenants allow OAuth apps even when they restrict ICS publishing.
Imported events are duplicated
Re-importing the same .ics creates duplicates. Always import into a dedicated calendar so a mistake can be cleaned up by deleting that one calendar.
Subscribed calendar refreshes too slowly
Outlook fetches subscribed calendars roughly every 3 hours. If you need faster updates, switch from subscription to a real sync tool.
Can I merge calendars in Outlook desktop without publishing?
Yes — desktop’s File → Save Calendar exports an ICS without publishing. Then on the destination account, File → Open & Export → Import/Export → Import an iCalendar file and pick the saved .ics. This bypasses tenant publishing rules entirely.
Picking the right method
| You want… | Use |
|---|---|
| To see events from both in one Outlook view | Method 1: Overlay |
| One-time consolidation of a deprecated calendar | Method 2: Publish and import |
| Both calendars to stay in step continuously | Method 3: XCalSync |
| To sync across personal and work tenants without IT involvement | Method 3: XCalSync |
| To filter or anonymize events on the way over | Method 3: XCalSync |
For the day-to-day “two active Outlook calendars that need to know about each other” problem, Method 3 is the only one that delivers without recurring maintenance.
Get started for free with XCalSync. No credit card required.
Frequently asked questions
- Yes. In Outlook on the web, the simplest option is to add the second calendar via Add from directory (works within one Microsoft 365 tenant) or Subscribe from web (works across tenants and personal accounts). Both give a read-only overlay. To actually merge events as native, editable items, use the publish/import flow in this guide.
- Publish the source calendar to an ICS URL, download the .ics, sign in to the destination account, and import. The events become native, editable events on the destination side. The source's URL should be unpublished after import to prevent ongoing access.
- Your Microsoft 365 tenant has disabled external calendar sharing. There's no client-side override. Either ask your IT admin to enable Outlook calendar publishing for your account, use Outlook desktop's File → Save Calendar to bypass tenant publishing, or use a sync tool that authenticates via Microsoft Graph instead of public URLs.
- Yes — this is one of the most common scenarios. Both support ICS publishing and importing, so the publish/import flow works. The blocker is usually on the work side: your tenant's sharing policy. If 'Publish a calendar' is missing on the work account, ask your admin or use a sync tool.
- Re-importing the same .ics creates duplicates because Outlook does not dedupe on import. Always import into a dedicated destination calendar (not your primary), so a re-import that creates duplicates can be cleaned up by deleting that one calendar.
- Most do. Failure modes are usually around recurrence with custom exceptions and series spanning a daylight-saving change. Spot-check a few recurring meetings after import — if a series shows only one occurrence, the recurrence rule didn't survive the .ics export.
- The publish/import method is a snapshot, not a sync. Future events created in either calendar won't appear in the other. To keep them updated continuously, use a sync tool like XCalSync that connects via OAuth (Microsoft Graph) and runs on a schedule of minutes.
- Yes. Outlook desktop can show multiple calendars side-by-side or in overlay mode. Right-click a calendar in the navigation pane and choose Overlay to combine them visually. This is a viewing mode only — events stay on their source calendars.